Feb. 8, 2023
#hendrix
#music
#smashbits
Music is a source of inspiration. Sometimes this inspiration takes some time to surface. Music can influence you indirectly through your emotions. This is a story about how music directly influenced the name of my website.
When I was young, I used to listen to U2, Simple Minds and those kinds of bands. Those were the bands that came out with new music at the time. It was the period after which I left bands like Wham and Duran Duran behind. It was also the time where I began to discover Jimi Hendrix. At the time there was a Levi's commercial that featured the track "Crosstown Traffic". I was intrigued by it. Somehow it was different. It fit perfectly to the soundtrack of Tour of Duty that was very popular amongst us.
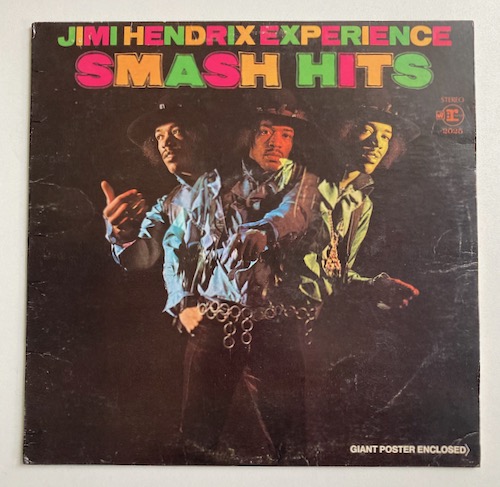
Anyway, one day after work, I was walking home through my hometown's city center and there was some kind of evening market taking place. Some guy was selling CDs and he had a copy of "Smash Hits" by Jimi Hendrix, at a price I could afford, so I instantly bought it. That opened up a whole lot of new tracks I did not know. I loved it!
I became a great fan of all of Hendrix' work and bought a lot of his albums. The CD that started it, I lost. Maybe I lent it to someone, I don't remember. Since I already owned all of the music on that CD, I did not really miss it.
Many many years later, I thought it was time for my own web domain, it came quite naturally to me that it had to be SmashBits. A nice reference to that first Hendrix album. So since 2008 my domain is active.
The picture below is a photo of a recent copy of "Smash Hits" that I stumbled upon on Discogs, when buying another album I wanted. It's a great addition to my collection and bought back the memories and the story behind my domain name. It was a cheap copy, that someone has enjoyed very much, judging by how it crackles. There's tremendous joy in Smash Hits!

SmashTunes is a Mac app that displays Spotify and Apple Music track info in the white space of the menu bar, so you can see what's playing in one quick glance.read more...
Kid's Lingo is an educational iPhone and iPad game for children. The aim of the game is to guess words from a set of words that are known to them from primary school. This makes them learn words and improve their spelling skills.read more...

For all retro Apple II enthusiasts ADTPro is a tool you can't live without since it allows you to backup your Apple II disks or create new ones from a variety of sources.
This post is about how to setup ADTPro from scratch on Linux. An alternative to installing ADTPro by hand on an existing Pi would be to install a full 'Apple II Linux image' like A2Cloud. Doing things by hand also gives us more control, in case we want to tweak things. In my case tweaking things is necessary anyway, since I'm using an USB adapter that is not supported out of the box by Linux (and which I could not get to work on modern macOS versions anyhow).
Ok, so let's get started. First here's a list of stuff I used:
- A Mac for connecting to the Pi. This means that this post is Mac-centric, but thing's don't get too dramatic. At least Linux users should find it easy to follow along.
- XQuartz. XWindows environment for the Mac. This program will allow us to display the graphical interface of ADTPro on our Mac display, which alleviates the need for a display for the Pi, and is much easier and lightweight than an VNC solution.
- Raspberry Pi setup with Raspbian.
- Keyspan USA-28x USB to serial adapter. You will need some sort of USB to serial solution. I happened to have a Keyspan lying around, so I could use that. The ADTPRo manual pages goes through a lot more options.
- Apple IIgs. My good old Apple II that will be the ADTPro client.
Raspberry Pi setup
Installing a Linux distribution on a Pi is easy, if you've followed a tutorial like this. I've used the Buster Lite image, since I am planning to use the Pi headless (i.e. without a display attached to it).
After you've installed Debian on your Pi, have booted it, and logged in. You may want to enable SSH on it, so you can login remotely. From this point onwards, you will not be needing the display for your Pi anymore (if you want to).
Extra software
Because ADTPro is a Java program we need Java installed: sudo apt install openjdk-8-jdk. Note that I installed the development kit, the runtime environment would probably have been sufficient for what we're doing, and faster, so grab a cup of coffee while waiting.
ADTPro installation
It is quite easy to build ADTPro from source. You will just need a JDK and the Ant build system. For this tutorial we will use a pre-build version, version 2.0.3. Just download it from this page (using wget) and unzip it.
Now cd to directory ADTPro-2.0.3. There are bunch of files here that are not runnable, yet. By issuing the command chmod +x adtpro.sh we can make the ADTPro shell script runnable.
XQuartz
You can download and install XQuartz from its website. After it is installed you should open up its preferences and make sure that the 'Click-through Inactive Windows' checkbox is checked on the Windows tab. Without this checked, the ADTPro window does not respond to mouse clicks.
From an XQuartz terminal window, we now can connect to the Pi with this command: ssh -X pi@<IP of your Pi>.
The '-X' switch in the command will make sure that all XWindows windows will be created on our Mac, within the XQuartz environment.
After you have connected to Pi via SSH, it is simply a matter starting the adtpro.sh shell script. After a little while the ADTPro UI should be displayed on your Mac.
Next steps are bootstrapping ADTPro or just send disks to backup your existing pile of disks. Enjoy!